|
| Calendar & News | Columns | Features | Gallery | Showcase |
|
|
|||||||||||||||
|
| Scanning: An Alternative to Low Power Photomicrography |
|
Richard Frederickson Low power photomicrography is used to document structural details of stained histologic specimens, such as mouse embryos. Traditionally, this process has been a challenging task that often produces less than desirable results. The method described here relies on scanning the specimen directly, using a professional grade film scanner and a fabricated holder. This combination yields a first generation image of high quality, with even illumination and focus throughout the entire field and enables the acquisition of large specimens in a single pass.
|
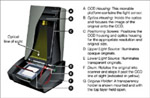
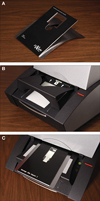
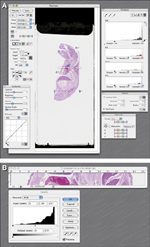
Introduction Since 1998, our department has used Imacon Flextight scanners to digitally capture a variety of media, including black-and-white and color positives and negatives in film formats, from 35 mm through 4x5. The scanner’s ease of use, speed, resolution, and 14-bit image capture were all factors in selecting the Precision II, and subsequently replacing it in 2005 with the 949 (16-bit color with auto focus). Another important scanner characteristic is dynamic range—the ability to capture detail in the darkest darks to the lightest lights without clipping data in any of the channels. Many scanners boast high Dmax values, but are unable to deliver when presented with a challenging subject. Imacon scanners are Macintosh and PC compatible, and include the manufacturer’s FlexColor software. The Flextight scanners are marketed as CCD drum scanners because they use a charged coupled device (CCD) for imaging, and they wrap the original around a “drum” to ensure the film lays flat at the optical line of sight (highlighted in yellow in Figure 1). This glassless technology yields a digital capture comparable to costly drum scanners without mounting the original to an acrylic drum, application of gel, or hiring specially trained staff to operate the unit. Since there are no additional media in the optical path, the Flextight method avoids the formation of Newton rings, an interference pattern of concentric rings that can occur with both drum and flatbed scanners. These often appear in the scanned image when pockets of air become trapped between the scanned item and the scanner’s smooth surface and are more likely to happen during periods of higher humidity. The system was, however, initially incompatible with rigid material, such as mounted transparencies or glass histology slides. Once Imacon released an accessory product to scan mounted slides, we were able to harness the optical capabilities of this professional-grade scanner for histopathology. Low Power Photomicrography Optical light microscopes are optimized to resolve subcellular detail within a tissue specimen at high magnification. When these instruments are used at low magnifications, however, the photomicroscopist faces a daunting task due to a number of technical/optical limitations inherent in the instrument. For example, it is hard to maintain even illumination throughout the field of view, and young eyes frequently have difficulty achieving proper focus (Vetter 1988). Corner-to-corner focus is difficult to achieve, and spherical lens aberration is common at the periphery (Burns 1997). Large specimens, such as newborn mice or older mouse embryos, are typically photographed in sections and spliced together as a montage. This process is time consuming and can result in a composite image with missing tissue and irregular margins (Figure 2A). Automated systems that tile a series of high power images are available, but these are expensive, time consuming to operate, and bring with them additional technical issues such as two dimensional optical aberrations (Aperio, online). Similarly, various photographic apparatus, such as slide duplicators, copy stands with light boxes, and macro stands, have been used to produce low power images, but, again, with relatively poor results, due to errors including soft focus, hot spots, and bad color balance (Montague et al. 1995). Given the proliferation of digital capture devices and that the 35 mm film format is similar in width to the typical 1x3 inch glass slide, it follows that there should be a simple means to capture these specimens directly—with the histologic specimen acting as the “emulsion” residing on a glass plate medium. Two methods have been mentioned in the literature: using a flatbed scanner (Groneberg and Peiser 2002) and using a film scanner designed to accommodate 35 mm film (Azumi 1998). Initial attempts to scan histologic specimens using a variety of desktop flatbed scanners failed to produce images suitable for display or publication because of limited optical resolution, low dynamic range, and poor image sharpness (Figure 2B)—despite the flatbed manufacturers’ promotion of their device’s film scanning capabilities! Another drawback of the flatbed scanner is the optical path itself, which includes mirrors and both sides of the glass; all of these surfaces create the potential to introduce artifacts into the image, such as streaks, smudges, and dust. Furthermore, as discussed earlier, the glass-to-glass contact between the specimen cover slip and the scanner’s glass surface can cause the appearance of Newton rings, which are difficult to avoid and significantly degrade the quality of the captured image. Using a digital scanner designed for film is preferable to the flatbed scanner, and several units were evaluated before selecting the Imacon Flextight Precision II. Both consumer- and “prosumer”-grade film scanners have improved significantly over the years and offer superior dynamic range and sharpness over flatbed scanners and are competitively priced. Clearly, most film scanners today are capable of reproducing well exposed film and may be able to capture a well stained specimen slide (Gebert et al. 1998). A subject with either a very low or very high range of tonal values presents a particular challenge for any capture method. Since the structures of some histologic specimens can be darkly stained while others are barely stained at all, the dynamic range (Dmin to Dmax) of a scanner becomes the most critical characteristic when evaluating its effectiveness. My more challenging test specimens exceeded the dynamic range of all of the scanners examined except the Flextight. The method described here uses the Flextight film scanner to overcome the limitations of the traditional and alternative methods described above, and provides a high quality product that captures the original specimen both faithfully and efficiently (Figure 2C). Holder Design, Fabrication, and Testing An off-the-shelf histology slide holder is not available for the Flextight scanners from either the manufacturer or any known third party. To enable the scanning of mounted transparencies, Imacon (now Hasselblad) offers a 35mm Flextight Slide Mount Holder (Figure 3A). The holder consists of a rigid plate with a 2x2 inch aperture for a mounted slide. The rigid plate is attached to a flexible base, which wraps around the internal drum and is used to draw the holder into the scanner. The slide holder is held in the horizontal position by a platform adapter (Precision models, Figure 3B). The newer models, including the 949, feature both normal and horizontal feed table positions eliminating the need for the platform adapter (not shown). Using the Imacon 35 mm slide holder as a prototype, I designed a custom holder, and our millwright shop fabricated the adapter (Figure 3C). The narrow dimension of the aperture runs parallel to the scan direction to make use of the scanner’s maximum optical resolution. The aperture can be milled to accommodate other widths (e.g., 2x3 inch glass slides), but the depth is limited to about three inches because of internal clearance (a longer slide holder would contact the rear of the scanner body). The addition of a custom holder size within the FlexColor software completes the installation process. I used a standard stage micrometer and several histologic specimen slides to capture test images at the maximum optical resolution of the Precision II (3,148% at 200 ppi), and a Fujix Pictrography 4000 dye transfer printer to prepare prints at 200 dpi (one-half the printer’s resolution of 400 dpi). This process resulted in a final reproduction size of 31.5 times life size with excellent structural detail and sharpness, color, clarity, and even illumination. The magnification achieved was approximately equivalent to viewing a specimen with a 3x objective on a traditional microscope (a 3x objective plus a 10x eyepiece). [Note: The newer Flextight 949 yields a printed image of 40 times life size at 200 dpi, equivalent to a 4x objective with 10x eyepiece.] Standard ProcedureScanning a specimen slide is a significantly different process than capturing an image using exposure and contrast settings common to a digital camera attached to a microscope. Instead, capturing a full range digital image with a scanner is based on setting the black point (shadow) and white point (highlight), the typical procedure used with both flatbed and film scanners. This process yields an image that has good detail throughout the tonal range and is not easily posterized by post-acquisition adjustments. Fortunately, only a few settings are required to achieve excellent results (Figure 4A). My standard settings for the Flextight 949 are:
At this point, it’s worth noting that, for offset reproduction, it is essential to maintain a background of no less than two to three percent in at least one of the process colors CMYK (known as the “scum dot”); this correlates to RGB values of about 245-245-245. The presence of a scum dot ensures that the image area is clearly defined and subtle highlight detail is not lost in the printing process. Once I’ve successfully captured a good image of the specimen, I document those settings and scan a standard micrometer slide with the same settings. The resulting scan is saved in the folder along with an untouched copy of the specimen scan. I then copy the micrometer grid and paste it into a new layer of the specimen scan, and save the composite image in the Photoshop® (.PSD) format. Adding the micrometer grid to the image at this stage provides an accurate means of determining the final scale of the captured specimen throughout the presentation/publication life cycle. The 949 scanner is significantly faster than its predecessors, providing a preview of a 1x3 inch slide in under 15 seconds and scanning at up to 200 MB per minute. Auto focus works well on most specimens, and a full slide can be imaged at maximum resolution in under four minutes (Table 1); however, most image captures take a fraction of that time since only a portion of the slide is being scanned. Table 1. Summary of scan performance Preview: :12 Total time 5:39
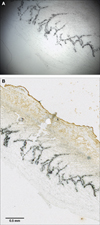
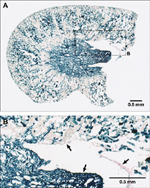
Results One of the greatest frustrations to a scientist is seeing detail through the microscope’s eyepiece and not being able to capture it for presentation or publication (Figure 5A). In this case, the specimen exhibited so little density that the traditional photomicroscope and digital camera could not produce a publishable image. However, a publishable image was acquired through scanning. By setting the black point to the level of the positive stain and white balancing the clear glass, a full tonal range image was achieved with a significantly larger field of view and superior tissue detail (Figure 5B). Flextight scanners possess such a wide dynamic range (Dmax 3.9, Precision II; Dmax 4.9, model 949) that even the most challenging specimen is successfully captured using this method. While Figure 5 is an example of a very low dynamic range specimen, Figure 6 is an example of a very high dynamic range specimen. In the latter, the scanner was presented with a subject that was both darkly stained and had significant highlight detail that was close in value to the optical glass background. Even so, the scanner was able to maintain all the detail in the extreme highlight as well as in the shadows (arrows in Figure 6B). In this case, the specimen exceeded the density range of the Precision II, but a subsequent scan using the 949 held the shadow detail and has been used here. ConclusionsLow power photomicrographs are traditionally challenging and have required at least some digital processing to make them publication ready. The scanning method described here provides a means to directly acquire digital images of histologic specimens at low magnification that are of exceptionally high quality and require very little post-acquisition adjustment. Acknowledgments Many thanks go to those who have assisted in the development and evaluation of this method. To Tom Crone and Jim Notnagle of the Millwright Shop for design review and fabrication of the holders; to Keith Rogers, F.I.B.M.S., and Jerrold M. Ward, DVM, PhD, for providing specimen slides to work with and reviewing my test prints; to Mark Duhaime of Hasselblad USA (formerly Imacon USA, Inc.) for providing the cutaway artwork (Figure 1); and to the many supportive clients who have allowed me to experiment with their slides. Special thanks go to Ken Michaels, FBPA, Manager, Visual Communications, for supporting this project, for critical review of the working manuscripts, and for his continuous support of my participation with the BCA over the years. This project has been funded in whole or in part with federal funds from the National Cancer Institute, National Institutes of Health, under contract number N01-CO-12400. The content of this publication does not necessarily reflect the views or policies of the Department of Health and Human Services, nor does mention of trade names, commercial products, or organizations imply endorsement by the U.S. Government. References Aperio Technologies, Inc. The advantages of line scanning for rapid entire-slide digitization (Technical Note); online at: http://www.aperio.com/PDF_docs/technical_factors_to_consider.pdf, last accessed 9/30/06. Azumi, N. 1998.Creating low-power photomicrographs using a 35 mm digital slide scanner. The American Journal of Surgical Pathology 22(7): 908. Burns, B.F. 1997. Creating low-power photomicrographs using a 35 mm digital slide scanner. The American Journal of Surgical Pathology 21(7): 865-866. Gebert, A., Werner, K., Posselt, W. 1998. Use of a digital film scanner to enhance low-power bright field photomicrography. Anatomy and Embryology 198: 435-438. Groneberg, D. A., Peiser, C. 2002. Flatbed scanners as modern tools of digital reproduction in pathology. Histopathology 41: 171-172. Montague, P.R., Meyer, M., Foldberg, R. 1995. Technique for the digital imaging of histopathologic preparations of eyes for research and publication, 102: 1248-1251. Ophthalmology Vetter, J.P. 1988. Photomicrograph: A translation into the vernacular, Part IV: Producing high quality photomicrographs. Journal of Biological Photography 56: 89-108. Richard Frederickson, FBCA, is the Senior Technical Specialist for Scientific Publications, Graphics & Media at the National Cancer Institute at Frederick, Frederick, MD, where he specializes in scanning, color management, and prepress. He has served the scientific community for over 24 years of his 27-year career in the visual arts. Richard has presented at the local and national levels, has served as BIOCOMM Session Moderator, Program Chair, and now serves as Director of Conferences as an elected member of the BCA Board of Governors. He has previously published one journal paper and has received several BPA/BCA awards, including BPA Journal Paper First Award (1989), Best in Show (BioImages 2004), and the BCA President’s Award in 2004. Other published work includes Pathology of Genetically Engineered Mice (Imaging and Graphics Editor). His background includes the BPA Rochester Workshop (1987); an A.A. degree in Technical Theatre from Montgomery College, Rockville, MD (1982); a B.A. degree in Visual Communications from Hood College, Frederick, MD (2004); and he is currently pursuing an M.B.A at Mount St. Mary’s University, Emmitsburg, MD. Email: fredericksonr@ncifcrf.gov |
Copyright
2007, The Journal of Biocommunication, All Rights Reserved
Table
of Contents for VOLUME 32, NUMBER 2