|
DVD Authoring in the Modern World |
Dan Austin, BA, MS Introduction The number of DVDs and DVD players has exploded exponentially since the first DVD player appeared on U.S. markets in 1997. Since that time more than 140 million DVD playback devices and 4.7 billion DVDs with 47,000 titles have been sold in the United States (Digital Information Group 2005). In addition to having twice the resolution of videotape, DVDs are cheaper to produce, more durable, not as easily damaged by magnetic fields or changes in temperature and make no contact with a play head that could cause physical wear (DVD Forum 1996). Unlike videotape, DVDs are organized in a non-linear, menu-driven fashion, allowing the end-user direct access to scenes or information, and compared with other media types, DVDs certainly live up to their name, “Digital Versatile Disk.” DVDs can include many sources of digital material including: video, audio, still images, animation, graphics and text. The advantages of DVDs are evident by looking at a DVD menu (Figure 1). The main menu (A) allows you to play the entire movie or access any one of many sub-menus from which you can play particular scenes (B); choose any one of several soundtracks or subtitles (C); view additional information on the disk outside the movie (D); or in the case of WebDVDs, access additional material via the Internet (E).
Historically, DVD authoring was limited to the Hollywood studios and large corporations, but with the advent of computers with DVD writable drives and DVD authoring software designed for the consumer, anyone can produce their own DVDs. When created properly, these DVDs can be viewed with DVD players all over the world. Depending on the platform, you would need either a 1 GHz Macintosh G4 running Mac OS 10.3 or a 2 GHz Pentium 4 PC running Windows 2000; 512 MB of RAM and 20 GB of free hard drive space. A complete DVD authoring set-up can cost less than $1500. DVD Writable Drive Formats In 1995 the DVD Forum, an industry group that included computer heavyweights IBM, Intel, Microsoft and Sony, adopted the first standard, DVD-Video (DVD Forum 1996). A writable DVD format standard (DVD-R) followed in 1997 (DVD Forum 1997). A competing format, DVD+R was introduced in 2002 (Taylor 2005). With more than 50 possible formats (Taylor 2005) it is difficult to decide which DVD format to use, let alone which writer to buy. DVD-R is the most universally accepted format, playing on over 95% of all commercial DVD players (Taylor 2005). It is important to make sure the DVD writer you buy is compatible with the computer platform, system software and other hardware in your system. Some of the more popular DVD writers are the Apple SuperDrive™, which writes DVD-R disks and the re-writable format (DVD+/-RW) and Sony and LaCie drives which write multiple formats. All of these drives write single or double layer DVD disks.
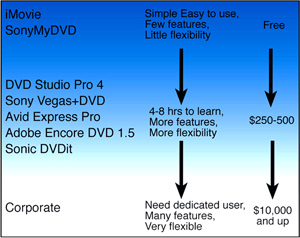
Authoring Programs Authoring programs range in price from free to those costing thousands
of dollars
Currently there are many good programs on the market. For the Macintosh, the field is dominated by iDVD 5™ at the amateur level and DVD Studio Pro 4™ at the professional level. For the PC, there are a host of programs. Some of the more popular at the amateur level are Sony MyDVD™ and Pinnacle Studio 9™ and at the professional level, Sony Vegas+DVD™, Avid Express Pro™ and Adobe Encore DVD 1.5™.
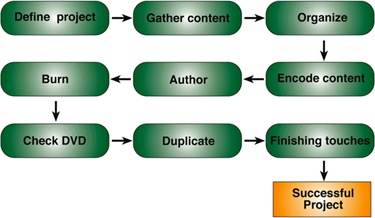
Steps in DVD Production Figure 3 illustrates the steps involved in DVD production, from the generation of an idea to the finished product. Let’s look at these steps a little closer. 1. Defining your Project The first step in DVD production is the generation of the idea. At this step you not only generate the idea, but also plan what you want to say and how you want to say it before you begin. You need to determine the content (what to film, photograph, record, or create) and then how you will present the content. Good planning saves time and money and is the key to a successful DVD. 2. Gathering Content The next step involves gathering the content. There are several important things to keep in mind when gathering content for a DVD. Different types of content may have different requirements to make a quality DVD. Ultimately the quality of the final product depends on three things, a) quality of the source material, b) visual or audio aspects, of the source material like excessive movement or faint audio. c) encoding of the content (Taylor 2001). Let’s take a look at the requirements for different types of media.
3. Organizing Content At this point you need to develop a menu structure for the DVD. In addition to being eye catching, the menu must be easy to navigate. Effective menu design revolves around getting information to your audience in the most intuitive manner, and within the parameters of a standardized DVD architecture. 4. Encoding Content All content should be encoded to fit on a DVD using either the MPEG-2 format for video, MPEG I-frames for images, any of the supported audio formats or text for subtitles and chapter markers (Taylor 2001). Everything except video encoding is straightforward. To achieve the best results for video, I use the following: a) only MPEG-2 encoding (Taylor 2001), b) the highest quality video source available, c) two-pass variable bit rate encoding, d) a software encoder with extended encoding times for video with abrupt changes in contrast or lots of movement. As a final step, I always check my results critically and make minor changes in encoding parameters to optimize quality.
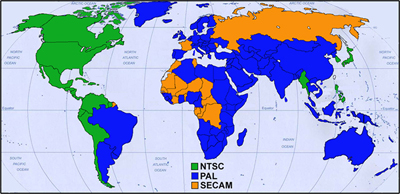
You must also consider which video format is most appropriate for your DVD’s audience. There are two major video formats worldwide, and they differ in size, lines displayed, frames per second and color encoding. These are NTSC and PAL/SECAM (Figure 4). Unfortunately these formats are not compatible. Although many PAL DVD players made in Europe play NTSC encoded material, no NTSC DVD player made in the United States can play the PAL/SECAM format. Those interested in making their own DVDs have the tools to create NTSC or PAL movies and DVDs with either NLE or authoring programs. It is also important to be careful about being “TV safe” with your project. When the DVD is viewed on a computer it will play the full frame, but will lose 5-10% of the image on both the horizontal and vertical axes when viewed on a TV screen (Figure 5) (Loy 2005). Most NLE and authoring programs will assist you in making your DVD “TV safe.” 5. Authoring Authoring is where you put it all together, creating a DVD that can be played on millions of DVD players around the world. Depending on the program you use, you will either have little control over the process or complete control of all aspects of the authoring process. The authoring program multiplexes, or combines, the collected audio, video, menus and subtitles into an interactive branching structure that can be burned on a DVD and played back on a DVD player. The DVD can contain a video stream with nine picture angles, eight streams of multichannel audio, eight languages and 32 menu levels in a multistory branching architecture (DVD Forum 1996). Video and images can also be displayed in either full screen (4:3) or widescreen (16:9) formats (DVD Forum 1996). In addition, you can add bonus tracks that can only be accessed with a code (DVD Forum 1996).
6. Making sure it plays Once you’ve created your DVD be sure to check that it plays like you expect it to. You may have previewed your project in the authoring program, but there is no substitute for testing it in the real world. Play your DVD on as many DVD players as you can in order to be sure it is playable and its quality is universal. 7. Duplicating You will more than likely need multiple copies of your DVD. If you need only a few copies it’s probably most efficient to just go ahead and burn them, but if you must produce many copies (>100), it’s more cost efficient to take them to an outside service bureau for duplicating. There are two ways of quickly duplicating that many disks. One method is to provide the service bureau with a final version of your DVD. They will simply duplicate it using a bank of high speed duplicating DVD writers. The other, and more efficient method, is to submit your material on DVD-Rs (Taylor 2001) or digital linear tape (DLT) (Taylor 2001). The service bureau takes that file, creates a master and presses as many copies as you need. An additional advantage of this method is that the DVDs are compatible with all DVD players (Taylor 2001). 8. Finishing Touches This is where you make your project stand out from the rest of the field by adding labels, DVD covers, jewel cases, sleeves and other things. CDs and DVDs will last from 40-100 years, but many of the materials used for labels and sleeves can actually damage the disk (Byres 2003). DVDs are just as susceptible to the damaging effects of acids in paper, certain glues and photographs (Byres 2003). Many labels and sleeves on the market use acid-based paper or glues that over time can damage the DVD to the point that it is unplayable. Fortunately, some manufacturers use acid-free paper and glues that will not damage disks. Alternatively, you can print directly on the special DVDs with an inkjet printer and non-damaging inks (Epson Incorporated 2005) or use a DVD writer with “Light Scribe™” technology to burn the DVD and burn a label directly onto the disk (LightScribe 2005). Sleeves free of harmful acids, like Tyvek, must be used to protect your DVDs (Byres 2003). It is also very important that you provide instructions for using the disk. This applies especially to WebDVDs, since a user might not know how to access the features that make these disks so useful. If you don’t provide the basic information on how to use your DVD, all your hard work might just end up in the trash. Conclusion The DVDs you produce not only look better than analog videotape, but can contain multiple sources of digital material, access content in a non-linear, menu driven fashion, are more durable than videotape and can be viewed by anyone with a DVD player all over the world. With a clear understanding of the authoring process and the standardized DVD architecture, along with the proper hardware and software, DVD authoring can be a useful tool for biomedical media departments.
References: Byres, F.R. 2003. Care and Handling of CDs and DVDs: A Guide for Librarians and Archivists. Washington, D.C.: Council on Library and Information Resources, National Institute of Standards and Technology, Washington, D.C. Epson Incorporated, www.epson.com Digital Information Group, 2005. Press Release, July 26, 2005, www.dvdinformation.com DVD Forum, 1996. DVD-Video Book. Tokyo, Japan: DVD Format/Logo Licensing Corporation. DVD Forum, 1997. DVD-R (3.9G) Book. Tokyo, Japan: DVD Format/Logo Licensing Corporation. Kadner, N., Hawes, T. 2003. Introductory DVD Authoring FAQ. West Hollywood, CA. Audio Intervisual Design, Inc. http://www.aidinc.com LightScribe Direct Disk Labeling, www.lightscribe.com Loy, M. 2005. DVD Studio Pro 3: In the Studio. Sebastopol, CA: O’Reilly Media. Taylor, J. 2001. DVD Demystified, New York: McGraw-Hill. Taylor, J. 2005. DVD FAQ,. http://www.dvddemystified.com Dan Austin is the Director of Graphics Core at the Center for Research
and Occupational and Environmental Toxicology at the Oregon Health and
Science University in Portland Oregon. He has BA and MS degrees in Biology,
and for 15 years conducted research in Biochemistry, Histology and Neurobiology.
He currently serves the media needs of 15 faculty and over 100 researchers
producing figures and movies for publications, presentations and meetings,
as well as developing new communications techniques. |
Copyright 2005, The Journal of Biocommunication, All Rights Reserved